Blog
Installing Skylight: An Ultimate Guide to a Leak-Proof Installation!
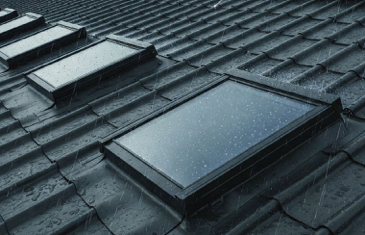
Thinking of installing skylight panels to brighten up your space? Whether it’s for your home, greenhouse, or industrial shed, a well-installed skylight does more than just bring in natural light—it can also reduce energy bills and add value. But one mistake can turn that light source into a leaking nightmare. In this guide, we’ll walk you through the essential steps to achieve a leak-proof skylight installation that lasts.
Choosing the Correct Material and Location
Choosing the right skylight and locating it strategically is the first step of the process. Factors such as the covered area’s purpose and the direction of sunlight must be considered. For example, garages, greenhouses, patios and industrial buildings where corrugated skylights are commonly used, require different leak-proof installation methods and materials compared to skylights installed on commercial or residential buildings, where solid flat polycarbonate skylights are normally the profile of choice.
Regardless of the profile chosen, to take full advantage of their benefits, it’s essential to ensure a leak-proof installation. Polycarbonate skylights are commonly installed as single-panel runs placed between roofing sheets, continuous multi-panel spans for broader light coverage, or vertically as side-lights on walls or sheds. In greenhouses, they often span the entire roof width and length to maximize sunlight exposure. Poor technique or material mismatches can lead to water intrusion, drafts, and structural damage.
When working with corrugated profiles, it’s essential to start by selecting a polycarbonate panel that matches the profile of your existing roofing. However, finding an exact match can be challenging. This is because steel roofing profiles are relatively inexpensive to produce, allowing manufacturers to create unique, proprietary designs in an effort to capture market share.
In contrast, the molds required for extruding polycarbonate profiles are approximately five times more expensive than those for steel. As a result, polycarbonate manufacturers are generally hesitant to invest in molds unless the roofing profile is widely adopted and in high demand.
Essential Tools and Materials for Installing Skylight
Before installing skylight panels, it’s crucial to gather the right tools and materials to ensure a smooth and leak-proof installation. Using improper equipment or missing key components can lead to installation errors, structural issues, or unwanted water leaks. Below is a checklist to help you get fully prepared before starting the job.
- A bench / table circular saw utilizing “triple chip” tooth design for straight long cuts.
- Portable circular saws for on-site straight cuts.
- Handsaw, metal shears or hand-held cutting knives can be used for localized, limited work.
- Fixing screws for polycarbonate sheets with EPDM rubber washers large enough to cover the drilled hole. For roof fixings, we recommend using Poly-Fast™ Timber for fixing polycarbonate sheets to wooden purlins, Poly-Fast™ Metal for fixing polycarbonate sheets to metal purlins. For valleys or wall fixings, we recommend using PolyXpand™ 40mm fasteners.
- Flashing (if needed, for transitions and penetrations).
- Neutral-Cure silicone sealant to fix and seal the areas between the polycarbonate sheets and wall or flashings. We recommend using Seal-Guard SG-N01 100% Neutral-Cure silicone sealant for best results.
- Infill closure strips to seal off the edges.
- Masking seal tape to prevent creaking where sheets overlap or come in contact.
Preparing the Roof for Installing Skylight Panels
When retrofitting into an existing roof with single or multi-panel skylight on roofs or side-lights in roofs and walls of metal-clad shed, gable, or hip type structures, mark and cut the opening to match the skylight dimensions. Cut carefully to avoid splintering or overcutting. Ensure the surrounding roof structure is sound and capable of supporting the skylight panel.
For dome type roofing or cladding installation, which is a simple, cost effective solution often used for agricultural or aquacultural greenhouse setup, the skylight panels normally span the entire width of the structure, which eliminates the need for cutting, but care should always be taken at the edges where they come in contact with walls or gutters, and which may require properly installed flashings to prevent leakage.
On shed, gable or hip type roofing installation, sheets should be installed at pitch rates of 10 percent (1″:10″ slope or 5.7°) or more. If installed at a lower pitch, additional sealing should be applied to insure weathering resistance. A minimum slope of more than 5% is recommended when installing skylight panels to promote water runoff.
Skylights panels should always be installed on the side and against the direction of wind and rain to prevent leakage. We recommend starting installing skylight panels skylight panelsinstallation from the bottom up, on one side, and working to the left or right accordingly. Never start working from both ends to the middle. Always lap the top panel over the lower one. Keep panels straight, flush and taut during installation.
(Read more: How to Cut Polycarbonate Sheets: Tips, Tools, and Techniques)
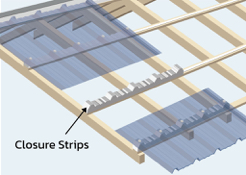
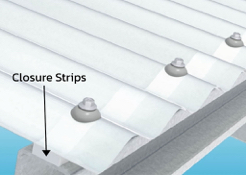
Installing Closure Strips
Before laying down the skylight panel, install foam or plastic closure strips along the roof purlins or rafters. These strips conform to the corrugation shape and seal off gaps that would otherwise allow water, debris, or insects to enter. Place the closure strip at the top or bottom edge fasteners’ center-line, and insert the fasteners through the said strip so it will be held firmly in place. A few dabs of silicone could hold the strip temporarily in place until the top panel is laid and screws are inserted. Secure them with a weather-resistant adhesive or compatible fasteners.
By adhering to proper techniques for sealing, securing, and allowing for thermal expansion, you can ensure a leak-free performance that lasts for years. A well-installed corrugated polycarbonate skylight offers more than just natural light—it’s a durable enhancement that improves both energy efficiency and visual appeal. Whether you’re handling the installation yourself or overseeing a professional, careful attention to detail is essential for a successful and long-lasting result.
(Read more: Skylight Leaks When It Rains? Cause and Solutions for Sealing.)
Final Thoughts on Installing Skylight the Right Way
By adhering to proper techniques for sealing, securing, and allowing for thermal expansion, you can ensure a leak-free performance that lasts for years. A well-installed corrugated polycarbonate skylight offers more than just natural light—it’s a durable enhancement that improves both energy efficiency and visual appeal.
Whether you’re handling the installation yourself or overseeing a professional, careful attention to detail is key to successfully installing skylight systems. Want help choosing the right polycarbonate skylight solution? Contact us today to get expert guidance.
Read more:
How to Choose the Right Polycarbonate Roof Sheet Colours?
Screws for Polycarbonate Roofing: Installation Guide