Blog
Installing Awnings: Step-by-Step Guide for a Flawless Installation!
Awnings are a good way to add shade and protection and are usually permanently attached to the side of the wall or buildings and can be extended well beyond its original premises. Whether your intention is to shield your patio, doorway, window, or carport, an awning offers protection against sunlight, rain, and debris.
Taking on the challenge of installing awnings yourself can be a cost-effective choice and provide a rewarding sense of achievement. Nevertheless, this task is not straightforward and necessitates careful planning, preparation, and the right tools. With proper guidance, you can confidently transform your outdoor areas into comfortable havens.
Preparing Your Awning for Installation
Before installing awnings, check local building codes to confirm if permits or inspections are required. Proper preparation ensures a smooth installation process.
- Plan the Location: Choose a spot clear of obstacles like exterior lights, vents, or gutters.
- Check Structural Support: Ensure access to wall studs or headers for secure mounting.
- Create a Safe Workspace: Set up a clear, level area for ladder placement.
- Enlist Help: Have a helper assist with lifting and securing components.
- Inspect and Prepare: Unpack and check all parts, review the manual, and gather necessary tools.
Step-by-Step Guide to Installing Awnings
Here’s a detailed guide to help you confidently tackle the process of installing awnings on your own, ensuring a safe and successful outcome.
1. Step1: Choose the Right Awning
Select the appropriate awning that meets your requirements. A variety of awning types are available, including stationary, retractable, dome, spear, and others. Additionally, you have the option to personalize your awning with various colors, fabrics, and designs.
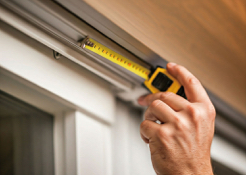
2.Step2: Measure the Installation Area
Measure the area designated for the awning installation. It is essential to determine the width, height, and projection of the awning, along with the necessary clearance and slope.
The width refers to the horizontal span between the two ends of the awning, while the height indicates the vertical distance from the ground to the top of the awning. The projection denotes how far the awning extends from the wall. Clearance is the minimum distance from the bottom of the awning to the ground or any nearby obstacle, and the slope represents the angle of the awning in relation to a horizontal line. Ensure that there is sufficient space and clearance for the awning to function safely and effectively.
3.Step3: Position and Align the Awning on the Wall
Indicate the position and level of the awning on the wall. Mark the precise center of the door, window, or wall where the awning will be installed. Subsequently, mark the exact center of the awning on the front bar or valance. Align these two marks and draw a straight line along the bottom edge of the awning, which will serve as the reference line for the mounting process, it is recommended to use a level to make sure that the lines are parallel to the ground.
4.Step4: Mark the Mounting Bracket Locations
Marking the locations for the mounting brackets on the wall. The number and type of brackets needed will depend on the size and style of the awning – generally, you’ll want at least two brackets, one at each end, plus one or more in the middle. Space the brackets evenly and align them with a reference line, using a pencil or felt-tip pen to mark their positions on the wall. You can also use a tape measure or straight edge to check the alignment and spacing.
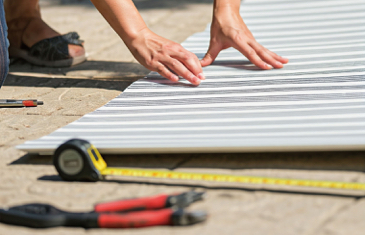
5.Step5: Prepare Tools and Materials
Gather all necessary tools and materials. Tools such as hand drills, level, measuring tape, screwdrivers, pliers, wrenches, ladders, markers are essential for installing awnings. Make sure that your awning kit includes all the brackets, screws, bolts and nuts, as well as the covering material.


6.Step6: Drill Holes for Mounting Brackets
Drilling holes for the screws that will secure the mounting brackets. Refer to the instructions provided with your awning to determine the appropriate size and type of screws and drill bits needed. Drill the holes at the marked locations on the wall, using a power drill equipped with a masonry, wood, or metal drill bit, depending on the wall material. For surfaces such as brick, stucco, or vinyl siding, specific techniques or tools may be required to successfully drill the holes.
(Read more: Roofing Screws Types)
7.Step7: Install the Brackets
Using screws and a screwdriver or drill. Align the brackets with the drilled holes and insert the screws through the brackets into the wall. You may need a helper for this step. Slide the awning into the slots or hooks on the brackets until it locks into place. Depending on your awning type, you may also need to use bolts, nuts, or pins to further secure it to the brackets. Ensure that the screws are tightened securely with a screwdriver or drill, confirming that the brackets are firmly affixed and level.
8.Step8: Test and Adjust the Awning
Finally, test the awning by opening and closing it, either manually or with a remote control if it’s a retractable model. Check the operation, alignment, and tension, and make any necessary adjustments by loosening or tightening the hardware.
Essential Tips for Awning Maintenance
Awning can provide shade and shelter with minimal upkeep, but regular maintenance ensures it remains functional and visually appealing. Although specific care instructions will vary depending on your model, here are some general tips to help keep your awning in top condition:
- Inspect Regularly: Periodically examine the awning for tears, damage, or loose fasteners. Address any issues promptly to prevent further wear or safety hazards.
- Dry Before Retracting: If the awning becomes wet, allow it to dry completely before retracting to avoid mold or mildew growth.
- Remove Debris: Use a brush to clear away leaves, twigs, or other debris that may accumulate over time.
- Rinse the Fabric: Occasionally rinse the awning fabric with water to remove dirt and grime.
- Follow Cleaning and Lubrication Guidelines: Clean the fabric and lubricate the moving parts as specified in your model’s manual to ensure smooth operation.
(Read more: How to Clean Polycarbonate Roof)
- Protect When Not in Use: Invest in a retractable awning cover to shield the structure from the elements during periods of inactivity, extending its lifespan.
Maximize the Benefits of Your Awning Installation
Installing awnings can transform your outdoor spaces into comfortable, stylish, and functional areas that provide protection from the elements. With proper planning, the right tools, and regular maintenance, you can enjoy the benefits of your awning for years to come.
Ready to take the next step in upgrading your outdoor space? Visit Vulcan Plastics to explore high-quality roofing and cover solutions that complement your awning project perfectly. Start your journey toward a more comfortable outdoor living space today!
Related articles:
Polycarbonate Sheets Prices: How to Choose the Right Grade?
Clear Pergola Roofing | The Benefits of PC Pergola Roof Panels
Essential Guide to Outdoor Polycarbonate Roofing Design Ideas!